Hi everyone,
Unfortunately with exams coming up there's no post this week..
But I will make it up to you when I finish (about 2 weeks from now) with a 3-in-1 bonanza!
It includes: a recipe, a food science post AND my first ever product review!
So stick around for that and apologies for the delay.
S.
Sunday, October 28, 2012
Friday, October 19, 2012
Bread 'n Butter Pudding!
Hey guys, sweet treat coming through!
As promised, today's recipe is: Bread and Butter Pudding
This is one of my favourites to make and eat, of course. Generally, if I'm having a sweet craving and there happens to be an old loaf of bread lying around I'll make this. Why throw out stale bread when you can make something delicious out of it? Let's get started!

1. First, preheat your oven to 180C. Then, cut the crusts off your bread and cut diagonally to make triangles.
2. Butter your dish and both sides of each slice of bread. Arrange the bread in layers.
[For rectangular dishes, I recommend standing up the triangles with the points in the air. For round dishes, I think going around in a rose shape looks nice :)]
3. In a separate bowl, whisk together the eggs, sugar, milk, cinnamon and vanilla.
4. Pour the mixture over the bread as evenly as possible, ensuring that the pointy ends get some custard as well. Spread over your favourite toppings!
5. If possible, leave the bread to soak and absorb the custard mix for 20 minutes, or as long as possible. [If in a rush, you can skip this step.]
6. Place your pudding dish into a water bath using a tray or roasting pan . To make the water bath, add water to the tray/pan until it reaches halfway up the pudding dish. Cover with foil.
7. Bake in the oven for 30 minutes. Remove foil and bake for another 15 minutes or until golden brown.
8. Serve the pudding hot with cream or ice-cream if desired!
When adding things like marmalade, place dollops around the dish and let it melt when baking!
I really like this dish because the pudding is moist, the sultanas give a burst of sweetness, the cinnamon and vanilla give off an amazing aroma and some of the bread becomes crispy like toast to contrast in to the soft center.
The point of this recipe was to use up leftovers; so let me know guys: How do you use your leftovers?
Thanks, hope you enjoyed!
S.
As promised, today's recipe is: Bread and Butter Pudding
This is one of my favourites to make and eat, of course. Generally, if I'm having a sweet craving and there happens to be an old loaf of bread lying around I'll make this. Why throw out stale bread when you can make something delicious out of it? Let's get started!
Bread and Butter Pudding

- Serves 2-4 (depending how much you can hold back :p)
Ingredients
- White sandwich bread, amount varies based on dish
[Stale works best if it's a little hard, otherwise fresh bread is okay]
- 2 eggs
- 2 tablespoons of sugar
- 350mL of milk
- A tub of butter, for spreading
- 1 teaspoon of vanilla paste or equivalent to 1 vanilla bean
- Cinnamon
Optional
- Sultanas/Raisins
- Orange Marmalade
- Brown sugar
- Ice cream/cream
1. First, preheat your oven to 180C. Then, cut the crusts off your bread and cut diagonally to make triangles.
2. Butter your dish and both sides of each slice of bread. Arrange the bread in layers.
[For rectangular dishes, I recommend standing up the triangles with the points in the air. For round dishes, I think going around in a rose shape looks nice :)]
 |
| Spread the love! |
 |
| Feeling inspired |
 |
| Custard mix |
4. Pour the mixture over the bread as evenly as possible, ensuring that the pointy ends get some custard as well. Spread over your favourite toppings!
5. If possible, leave the bread to soak and absorb the custard mix for 20 minutes, or as long as possible. [If in a rush, you can skip this step.]
6. Place your pudding dish into a water bath using a tray or roasting pan . To make the water bath, add water to the tray/pan until it reaches halfway up the pudding dish. Cover with foil.
 |
| Add your toppings! |
8. Serve the pudding hot with cream or ice-cream if desired!
 |
| Ready to share (or not!) |
 |
| An older version made in a rectangular dish |
 |
| YUM! |
I really like this dish because the pudding is moist, the sultanas give a burst of sweetness, the cinnamon and vanilla give off an amazing aroma and some of the bread becomes crispy like toast to contrast in to the soft center.
The point of this recipe was to use up leftovers; so let me know guys: How do you use your leftovers?
Thanks, hope you enjoyed!
S.
Thursday, October 18, 2012
My future direction
Hi guys, another quick update!
It's that time of year again... this Saturday marks the end of the semester!
..but it also means the start of the exam period .__.
But don't lose hope, I'll keep updating the blog in between my cramming sessions! :)
And in other news, my local shopping center renovated their fresh food markets! Which means I have access to even moooooooore goodies! Expect a lot more variety in the future.
After finishing up on exams, I'm aiming to focus on this blog and developing skills to make this as great as possible; whether it's discussing food, sharing knowledge, taking better photos or highlighting interesting videos.
I really want to interact with you guys, so please feel free to use the comment box on the side or leave me an email! :)
Thanks for your support, it means a lot!
S.
P.S. There's a sweet treat coming up! ;)
Saturday, October 13, 2012
Lazy Sundays
Another day, another post! :D
Today's one is a simple one, it's one of my go-to recipes when I'm in a pinch: Fried rice!
This is another recipe where you can rummage through your fridge or pantry, pick out your favourite ingredients and mix them together to make a meal! This only took about 10 minutes, so take that Jamie Oliver! :p
Again, with these kinds of recipes preparation is key. Today I had some roast chicken, corn and spring onions in the fridge. There was some rice in the rice cooker and we had eggs in the pantry. So then it was just a matter of shred, cut and wash and I was ready to go! If you have cooked ingredients, it's a good idea to heat them up in the microwave first. The sauces I used are based on a
Fried Rice
Rice, cooked and still hot
Chicken, cooked and shredded
Corn, boiled and shaved
Spring onion, chopped
Egg
Salt and Pepper to season
Sauce (optional)
Kecap manis - a dark, sweet soy sauce
Sriracha - a hot chilli sauce
Tomato sauce
Sesame oil
As you will notice, these ingredients aren't measured! It's all about adding as much or as little as you like :)
1. Prepare the ingredients as required.
2. Heat up a wok and add oil
I reaaaaaaaaaally like the way the egg gives the rice a creamy, delicious coating when you break the yolk! A little thing I like to do is to put a few drops of sesame oil on the egg, gives it that little smoky, nutty flavour that complements nicely.
So guys, this is one of my go-to recipes! Please let me know if you have any go-to recipes and what your favourite little additions are!
Hope you guys enjoyed this, don't forget to follow along if you haven't already :D
See you again soon.
S.
Today's one is a simple one, it's one of my go-to recipes when I'm in a pinch: Fried rice!
This is another recipe where you can rummage through your fridge or pantry, pick out your favourite ingredients and mix them together to make a meal! This only took about 10 minutes, so take that Jamie Oliver! :p
Again, with these kinds of recipes preparation is key. Today I had some roast chicken, corn and spring onions in the fridge. There was some rice in the rice cooker and we had eggs in the pantry. So then it was just a matter of shred, cut and wash and I was ready to go! If you have cooked ingredients, it's a good idea to heat them up in the microwave first. The sauces I used are based on a
Fried Rice
Rice, cooked and still hot
Chicken, cooked and shredded
Corn, boiled and shaved
Spring onion, chopped
Egg
Salt and Pepper to season
Sauce (optional)
Kecap manis - a dark, sweet soy sauce
Sriracha - a hot chilli sauce
Tomato sauce
Sesame oil
As you will notice, these ingredients aren't measured! It's all about adding as much or as little as you like :)
 |
| Nothing glamorous here |
1. Prepare the ingredients as required.
2. Heat up a wok and add oil
 |
| Savoury, spicy aroma and colour |
3. Add rice and quickly stir fry. After about a minute, make a well in the center and add your sauces. Mix well to incorporate sauce into the rice.
4. Add in the prepared ingredients and stir fry until everything is heated through and aromatic. Taste and season if needed.
5. Serve the fried rice!
 |
| Get it all in there! |
6. (Optional) Fry an egg sunny side up and season with salt and
pepper. Serve on top of the fried rice.
I reaaaaaaaaaally like the way the egg gives the rice a creamy, delicious coating when you break the yolk! A little thing I like to do is to put a few drops of sesame oil on the egg, gives it that little smoky, nutty flavour that complements nicely.
 |
| All set to go :) |
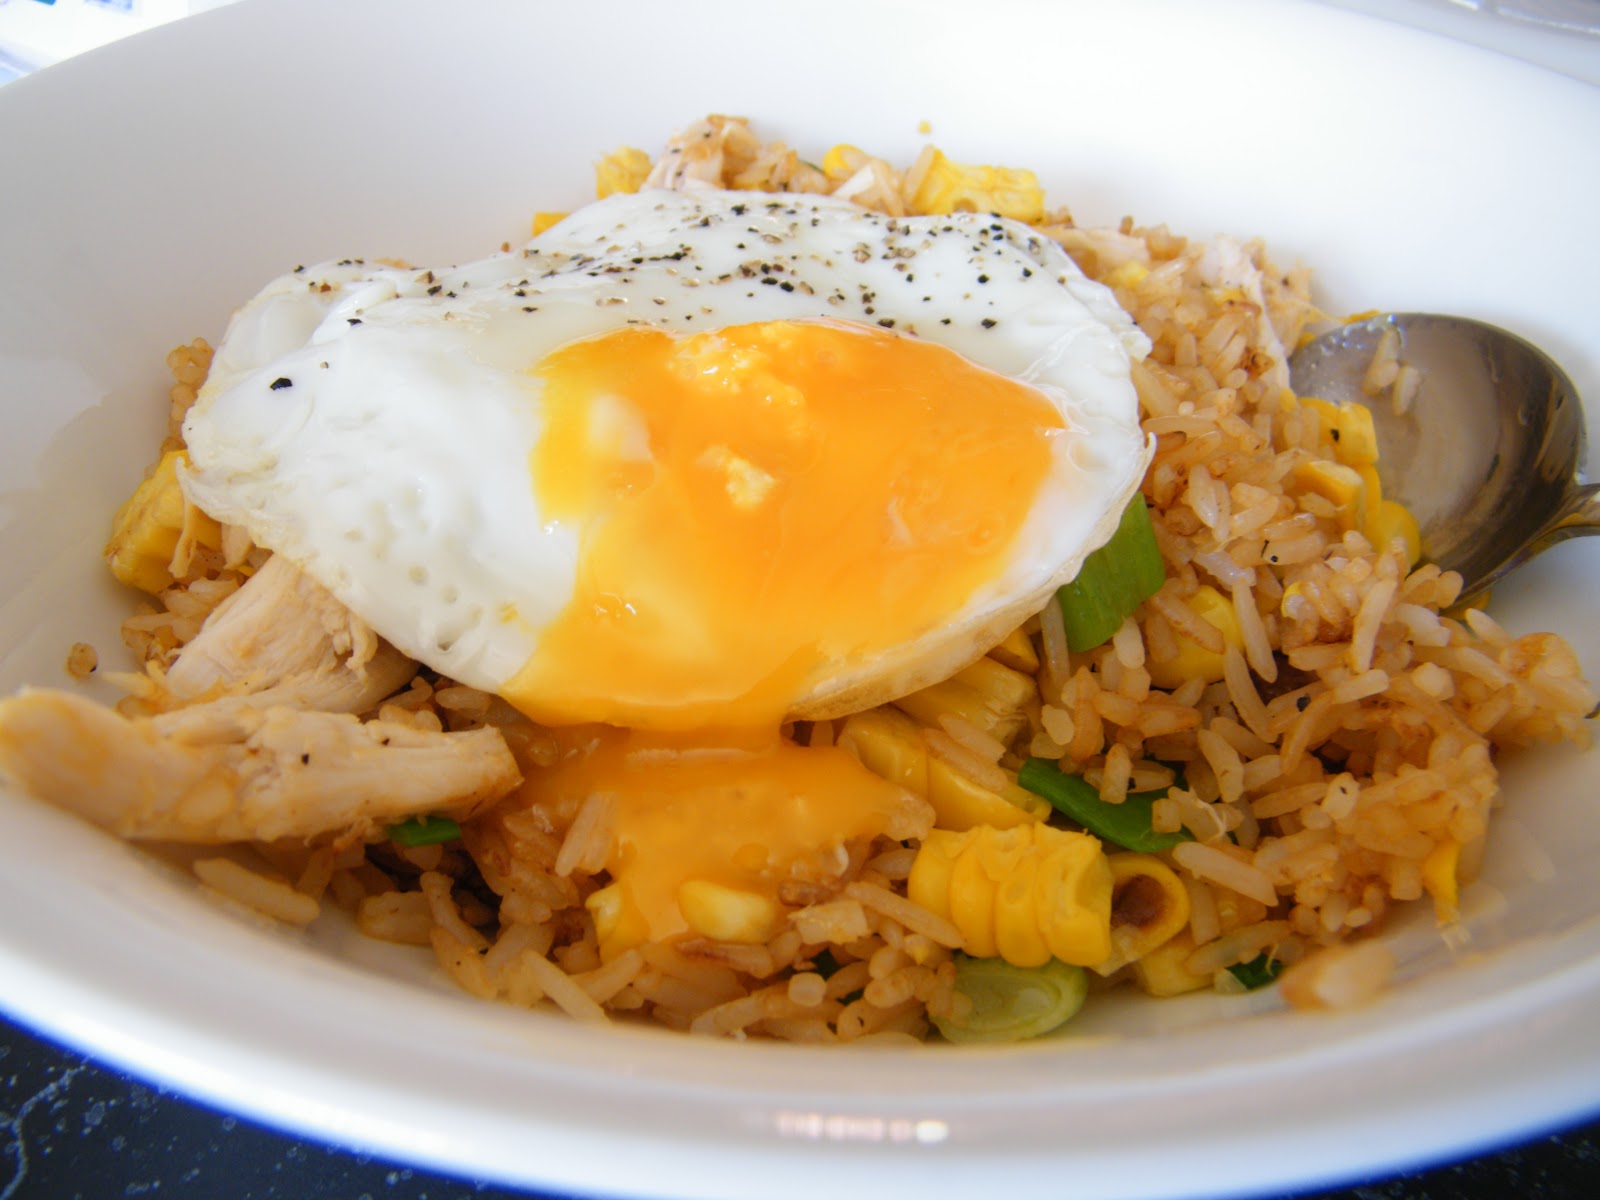 |
| Nothing better than a runny yolk, yum! |
So guys, this is one of my go-to recipes! Please let me know if you have any go-to recipes and what your favourite little additions are!
Hope you guys enjoyed this, don't forget to follow along if you haven't already :D
See you again soon.
S.
Friday, October 5, 2012
Omelette Wrap!
Hi guys, I bring good news!
Today's recipe is for Omelette Wraps! After another crazy week at uni, I decided to go back to the kitchen to relax this weekend. This idea came from my trip to Adelaide, where I had this crepe-like egg wrap filled with delicious goodies and a tasty sauce. It was like a cross between a sushi roll and a burrito! It ticked all the boxes: sweet, spicy, savoury, crunchy, crispy, fresh and smelled great too! It was from a stall called 'bing boy', definately worth a visit if you're ever in Adelaide.
Amazingly enough, when I came home and looked through some books I found a recipe that was similar to the wraps I ate. That's when it dawned on me, I HAD to make it!
The book I used was Rachel Allen's Easy Meals, a gift from my superamazinglyawesome cousin.
It's a simple recipe and can be filled with whatever you like! I used some left overs I had in my fridge, so go wild and make whatever combination you like!
Here's the recipe:
Omelette wrap (Makes 2 wraps)
4 eggs
2 tbsp milk
Pinch of salt and pepper
Fillings (This is what I used)
Corn, shaved off the cob
1 carrot, cut into strips
Roast BBQ Pork, diced
Spring onion, sliced
Sesame oil
Chilli sauce (I used sriracha)
1. Prepare your fillings, slice whatever you need to and if you're using cooked meats, reheat them.
2. Mix eggs, milk, salt and pepper in a measuring cup/bowl.
3. Heat up the pan on a high heat, with a bit of oil and butter until you seem some bubbles form.
4. Pour in half of the egg mixture into your pan and quickly swirl to get a full circle. Once you get a full circle, stop swirling and let it cook until the bottom is golden brown.
5. Carefully flip the omelette with a spatula and cook the other side until golden brown.
6. Once cooked, drain on some paper towels and repeat until you use all of the egg mix.
7. Assemble! Take your wrap on a plate and line your ingredients in the middle of the omelette. Top with your favourite sauces.
8. Fold left and right sides into the middle.
9. Pick it up and enjoy!
Overall, a pretty easy recipe. Good for brunches or lunches, hot or cold, just wrap them in non-stick paper and you're all set :)
So, that's a wrap guys! I hope you try this recipe out and post your delicious combinations! :D
Hope you enjoyed this as much as I did, don't forget to follow along if you did!
S.
Today's recipe is for Omelette Wraps! After another crazy week at uni, I decided to go back to the kitchen to relax this weekend. This idea came from my trip to Adelaide, where I had this crepe-like egg wrap filled with delicious goodies and a tasty sauce. It was like a cross between a sushi roll and a burrito! It ticked all the boxes: sweet, spicy, savoury, crunchy, crispy, fresh and smelled great too! It was from a stall called 'bing boy', definately worth a visit if you're ever in Adelaide.
Amazingly enough, when I came home and looked through some books I found a recipe that was similar to the wraps I ate. That's when it dawned on me, I HAD to make it!
The book I used was Rachel Allen's Easy Meals, a gift from my superamazinglyawesome cousin.
It's a simple recipe and can be filled with whatever you like! I used some left overs I had in my fridge, so go wild and make whatever combination you like!
 |
| Expect more from her :) |
Omelette wrap (Makes 2 wraps)
4 eggs
2 tbsp milk
Pinch of salt and pepper
Fillings (This is what I used)
Corn, shaved off the cob
1 carrot, cut into strips
Roast BBQ Pork, diced
Spring onion, sliced
Sesame oil
Chilli sauce (I used sriracha)
1. Prepare your fillings, slice whatever you need to and if you're using cooked meats, reheat them.
2. Mix eggs, milk, salt and pepper in a measuring cup/bowl.
 |
| Preparation is key |
4. Pour in half of the egg mixture into your pan and quickly swirl to get a full circle. Once you get a full circle, stop swirling and let it cook until the bottom is golden brown.
 |
| Get the circle and stop swirling! |
6. Once cooked, drain on some paper towels and repeat until you use all of the egg mix.
 |
| Don't want oily wraps |
 |
| Nice and fresh! |
 |
| Laced with sesame oil and chilli sauce |
8. Fold left and right sides into the middle.
9. Pick it up and enjoy!
 |
| Yum! |
So, that's a wrap guys! I hope you try this recipe out and post your delicious combinations! :D
Hope you enjoyed this as much as I did, don't forget to follow along if you did!
S.
Tuesday, October 2, 2012
Delays
Hi guys,
Sorry for the lack of posts lately! I've been doing a little bit of travelling and I have to catch up on assignments and other fun things at uni. Hopefully I can make something this weekend for you guys.
Stay tuned!
S.
Sorry for the lack of posts lately! I've been doing a little bit of travelling and I have to catch up on assignments and other fun things at uni. Hopefully I can make something this weekend for you guys.
Stay tuned!
S.
Subscribe to:
Comments (Atom)