Tuesday, December 4, 2012

The first ever product review!

Hey guys, it's been a while hasn't it? I'm sorry for the lack of posts but I've had some things that needed to be taken care of, along with some cooking to do! Since my cousins have also finished their exams, we decided to get together and do some baking!

For this product review, I will be examining 'Adriano Zumbo's Salted Caramel Macarons'!
You can find this product in Safeway/Woolworths, amongst other Zumbo desserts including brownies and chocolate mud cake.

The box from a visual standpoint is highly appealing, with pretty cool artwork, a clear photo of the finished product and clear, detailed instructions. The box also has a QR code for instructions, very nifty!


In the box you are given sachets containing almond mix, meringue mix, salted caramel filling and surprisingly also had piping bags and a stencil to draw circles for the macarons (a nice touch in my opinion, very user friendly!). The only additional ingredients needed are butter, water and salt (which is optional). I would also suggest using electric beaters to help whip up the meringue and the filling mixes.


Simply mix the ingredients together as detailed on the box, pipe your mixture onto the sheets with the traced circles and bake! While waiting, you can make the caramel filling by mixing butter and the caramel filling.


After baking, let the macaron shells cool before filling them and sandwiching them together! If you can manage to hold back from immediately eating them, you could leave them in the fridge overnight to help the macaron absorb some of the filling.


Overall, the macaron was crisp to the bite whilst also being nice and chewy on the inside. The filling tasted like caramel (as it should!), but altogether I found it very sweet. The appearance of the final product was fairly close in my opinion, but we clearly need to work on our piping skills...
My cousins and I agreed it reminded us of the honeycomb from Golden Gaytime ice-cream bars, which was funny.
The process of actually making them has been simplified to a great extent as opposed to making them from scratch, which is great! Plus we had heaps of fun making them :)

Hope you guys enjoyed this, give it a try!

S.


Wednesday, November 21, 2012

Freedom!

Hey guys, it's been a while hasn't it? Well, guess what's happening?
I'm on holidays now, which can only mean one thing... more posts! :D

As promised, this first one is a science-y post on vanilla!


Doesn’t the name alone sound seductive already? When added to a dessert, it imparts its own characteristic flavour, aroma and makes it all the more appealing.


www.wikipedia.org
Vanilla can be purchased in a variety of forms: as a whole bean containing the dotted black seeds, a paste, in extract form or an essence.

What’s the difference between vanilla extract and vanilla essence?
In most cases, vanilla extract is what you get when you take a vanilla bean and extract the flavour and aroma compounds by alcohol and other organic solvents, on the other hand vanilla essence is made using a synthetic form of a substance called ‘vanillin’ and is often heavily diluted with water.

Vanillin is a natural compound that is largely responsible for the aroma of vanilla, but there are also many other compounds in vanilla that also make up the smell and taste.

In one of the experiments my lab group conducted, we analysed the composition of vanilla extract, vanilla essence and pure vanillin. We found that vanilla extract had superior aroma and a smaller amount of water, compared to vanilla essence which had a weaker aroma and was almost completely composed of water!
Basically, vanilla essence is synthetic and mostly water while vanilla extract is made from real vanilla.

Luckily, most labelling of vanilla products will say ‘artificial’ if is it made synthetically. Just make sure you read the labels and understand what you are buying!


Hope you found this post informative and useful!


S. 
 

Friday, November 2, 2012

iJelly

Travelling the world and tasting delectable goods. Does it get any better?

Recently, I've been watching Anthony Bourdain's 'No Reservation' TV series (highly suggest looking him up on YouTube). Man, I wish I had his job :(

Basically what he does is travel to different countries and finds and eats local specialties and delicious foods. It's pure, gluttinous, mouth-watering food porn that makes me hungry every few minutes!
He doesn't just travel to fancy restaurants; he travels to restaurants in Sydney, street stands in Vietnam, fish and chip store in Scotland and many many other places!

The thing I really enjoy about this show is seeing the less fancy, complicated and poncy foods that still taste, smell or look amazing.

Some of my favourite, pure indulgent foods include: pho (Vietnamese noodle soup), fried eggs with runny yolks, deep fried fish and chips, Twisties/Cheezels/any snack food covered in the addictive fluro-orange artificial cheese flavoured powder and probably many many more.

My question to you is: What are some of your favourite foods? Guilty pleasures? Things that make your mouth water?


S.

Sunday, October 28, 2012

Exams-icles :(

Hi everyone,
Unfortunately with exams coming up there's no post this week..
But I will make it up to you when I finish (about 2 weeks from now) with a 3-in-1 bonanza!
It includes: a recipe, a food science post AND my first ever product review!

So stick around for that and apologies for the delay.
S.

Friday, October 19, 2012

Bread 'n Butter Pudding!

Hey guys, sweet treat coming through!
As promised, today's recipe is: Bread and Butter Pudding
This is one of my favourites to make and eat, of course. Generally, if I'm having a sweet craving and there happens to be an old loaf of bread lying around I'll make this. Why throw out stale bread when you can make something delicious out of it? Let's get started!

Bread and Butter Pudding
- Serves 2-4 (depending how much you can hold back :p)

Ingredients
- White sandwich bread, amount varies based on dish
[Stale works best if it's a little hard, otherwise fresh bread is okay]
- 2 eggs
- 2 tablespoons of sugar
- 350mL of milk
- A tub of butter, for spreading
- 1 teaspoon of vanilla paste or equivalent to 1 vanilla bean
- Cinnamon

Optional
- Sultanas/Raisins
- Orange Marmalade
- Brown sugar 
- Ice cream/cream


1. First, preheat your oven to 180C. Then, cut the crusts off your bread and cut diagonally to make triangles.
2. Butter your dish and both sides of each slice of bread. Arrange the bread in layers.
[For rectangular dishes, I recommend standing up the triangles with the points in the air. For round dishes, I think going around in a rose shape looks nice :)]
Spread the love!
Feeling inspired


Custard mix
3. In a separate bowl, whisk together the eggs, sugar, milk, cinnamon and vanilla.
4. Pour the mixture over the bread as evenly as possible, ensuring that the pointy ends get some custard as well. Spread over your favourite toppings!
5. If possible, leave the bread to soak and absorb the custard mix for 20 minutes, or as long as possible. [If in a rush, you can skip this step.]
6. Place your pudding dish into a water bath using a tray or roasting pan . To make the water bath, add water to the tray/pan until it reaches halfway up the pudding dish. Cover with foil.
Add your toppings!
7. Bake in the oven for 30 minutes. Remove foil and bake for another 15 minutes or until golden brown.
8. Serve the pudding hot with cream or ice-cream if desired!


Ready to share (or not!)
An older version made in a rectangular dish
YUM!
When adding things like marmalade, place dollops around the dish and let it melt when baking!
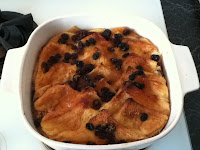
I really like this dish because the pudding is moist, the sultanas give a burst of sweetness, the cinnamon and vanilla give off an amazing aroma and some of the bread becomes crispy like toast to contrast in to the soft center.
The point of this recipe was to use up leftovers; so let me know guys: How do you use your leftovers?

Thanks, hope you enjoyed!
S.

Thursday, October 18, 2012

My future direction

Hi guys, another quick update!
It's that time of year again... this Saturday marks the end of the semester!


..but it also means the start of the exam period .__.
But don't lose hope, I'll keep updating the blog in between my cramming sessions! :)
And in other news, my local shopping center renovated their fresh food markets! Which means I have access to even moooooooore goodies! Expect a lot more variety in the future.

After finishing up on exams, I'm aiming to focus on this blog and developing skills to make this as great as possible; whether it's discussing food, sharing knowledge, taking better photos or highlighting interesting videos.
I really want to interact with you guys, so please feel free to use the comment box on the side or leave me an email! :)

Thanks for your support, it means a lot!
S.

P.S. There's a sweet treat coming up! ;)

Saturday, October 13, 2012

Lazy Sundays

Another day, another post! :D
Today's one is a simple one, it's one of my go-to recipes when I'm in a pinch: Fried rice!
This is another recipe where you can rummage through your fridge or pantry, pick out your favourite ingredients and mix them together to make a meal! This only took about 10 minutes, so take that Jamie Oliver! :p
Again, with these kinds of recipes preparation is key. Today I had some roast chicken, corn and spring onions in the fridge. There was some rice in the rice cooker and we had eggs in the pantry. So then it was just a matter of shred, cut and wash and I was ready to go! If you have cooked ingredients, it's a good idea to heat them up in the microwave first. The sauces I used are based on a

Fried Rice
Rice, cooked and still hot
Chicken, cooked and shredded
Corn, boiled and shaved
Spring onion, chopped
Egg
Salt and Pepper to season

Sauce (optional)
Kecap manis - a dark, sweet soy sauce
Sriracha - a hot chilli sauce
Tomato sauce
Sesame oil


As you will notice, these ingredients aren't measured! It's all about adding as much or as little as you like :)


Nothing glamorous here


1. Prepare the ingredients as required.
2. Heat up a wok and add oil


Savoury, spicy aroma and colour


3. Add rice and quickly stir fry. After about a minute, make a well in the center and add your sauces. Mix well to incorporate sauce into the rice.
4. Add in the prepared ingredients and stir fry until everything is heated through and aromatic. Taste and season if needed.
5. Serve the fried rice!
Get it all in there!
    6. (Optional) Fry an egg sunny side up and season with salt and    
        pepper. Serve on top of the fried rice.


I reaaaaaaaaaally like the way the egg gives the rice a creamy, delicious coating when you break the yolk! A little thing I like to do is to put a few drops of sesame oil on the egg, gives it that little smoky, nutty flavour that complements nicely.
All set to go :)
Nothing better than a runny yolk, yum!

So guys, this is one of my go-to recipes! Please let me know if you have any go-to recipes and what your favourite little additions are!
Hope you guys enjoyed this, don't forget to follow along if you haven't already :D
See you again soon.

S.